Search
Categories
Have a request?
This form does not yet contain any fields.


    Entries in omg yum (69)

    Wednesday
    Sep102014

    Tacos In Pasta Shells

    I'm am happy to say that after crossing the country and spending more than 3 months in a hotel, we have finally found a house to settle into!

    During the hotel time, we didn't exactly have a kitchen. A fridge, a microwave, and a dishwasher, along with a sink with a disposer. Not really suitable for cooking much of anything. As you can imagine, we have been more than dying for a home cooked meal. In fact, I imagine it will be awhile before I have the desire to eat another French fry. So I asked Hubby what he wanted for his first home cooked meal in the new place, and he instantly blurted out tacos in pasta shells. Who was I to argue? So although I posted this years ago, I think it deserves a revisit.  Enjoy!

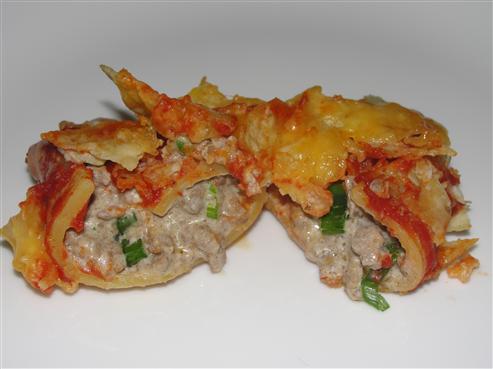
    Ok, let’s be honest here, this isn’t the prettiest food ever made.  What it lacks in beauty, however, it more than makes up for in flavor.  I don’t know if I can say for certain that this is my husband’s favorite meal I make, but it’s definitely top three. 

    Unfortunately, I can’t take credit for this fabulous creation, and I have no idea who to give credit to for it.  I got the recipe from my sister-in-law, who got it from a church cookbook, I believe.  I have made very few changes to the original I was given, so a big thanks to whomever the original creator may have been. 

    Alright, let’s get started.  Here’s what you’ll need: 

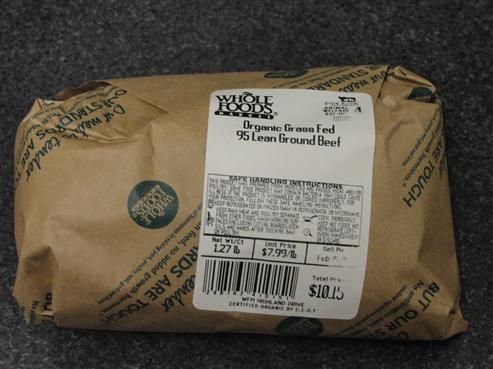
    • 1.25 Pounds lean ground beef
    • 8 oz. cream cheese
    • 5-6 green onions
    • 1 Large bottle of Taco Sauce
    • 3 cups grated cheese (I used Colby jack and extra sharp cheddar)
    • 1 box Jumbo Shells Pasta
    • 3 cups broken corn chips 


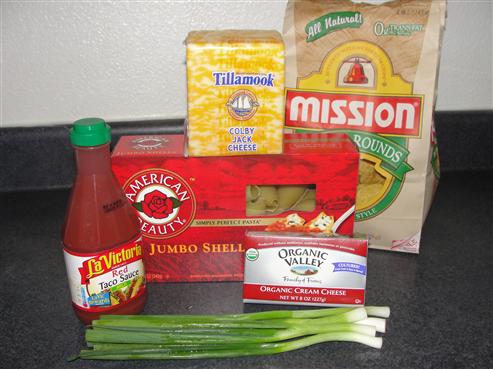
    I forgot to include the ground beef in the picture of ingredients (I'll probably do that a lot), but here it is. 


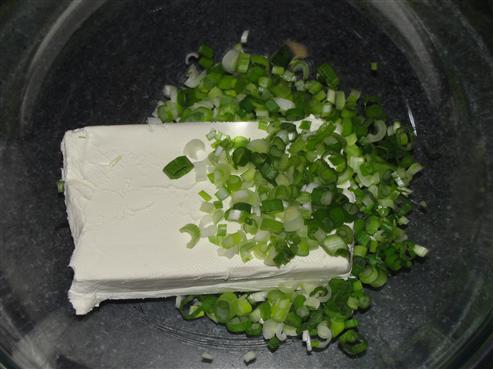
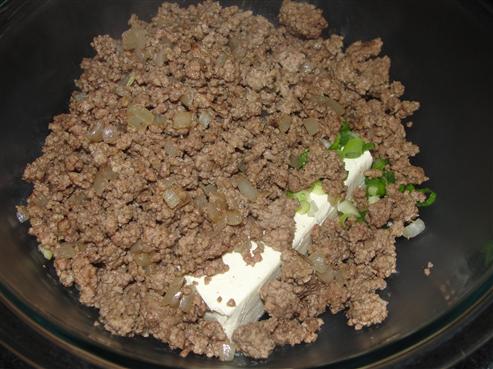
    Chop the green onions and throw them into a bowl with the cream cheese.  Set them aside for now. 


    Brown the ground beef, draining excess oil if necessary, and pour the hot meat over the cream cheese.  Yes, that is diced onion you see in my ground beef, and no, I didn’t include it in the list of ingredients.  It’s not strictly necessary, but pretty much, if I’m using ground meat, there is going to be diced onion cooked in with it.  Not only does it add flavor, but when you’re buying organic meat, it can get pretty expensive, and adding onion makes it go a bit further.


    Cover the bowl and leave it while you work on the pasta.  Basically just follow the directions on the package.  When it’s cooked, drain it and rinse it with cold water to cool the shells down.  Stir together the meat mixture.  My husband said I couldn’t post a picture of the filling by itself.  He says it looks like brains.  So, let’s just get to the stuffing part.  

    First, this is probably a good time to preheat your oven to 350°.  Also, you’ll need to drizzle the bottom of your pan/pans with taco sauce.  Just enough to keep the shells from sticking.  This recipe makes 24 shells.  I like to separate them into two pans, because with only two of us in the house, that easily feeds us twice.  I just put one pan in the fridge uncooked.  You can plan on about 4-6 shells per person, depending on how hungry everyone is.  

    Ok, stuffing… Gently open a shell and allow the excess water to run off. 


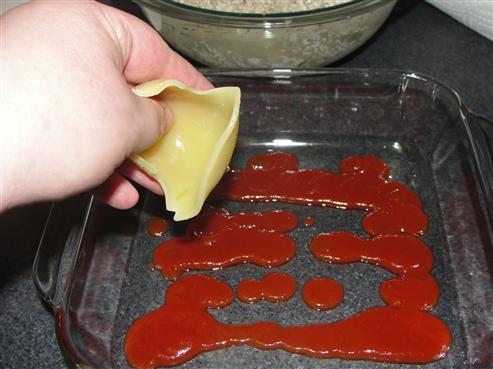
    Using a spoon, fill it with meat mixture, but not so full that it can’t close.  I like to overfill them slightly, then squeeze them shut (gentle, they split easily) and wipe any excess off, back into the bowl.


    Line them all up in the pan and drizzle them with taco sauce.  Don’t skimp here.


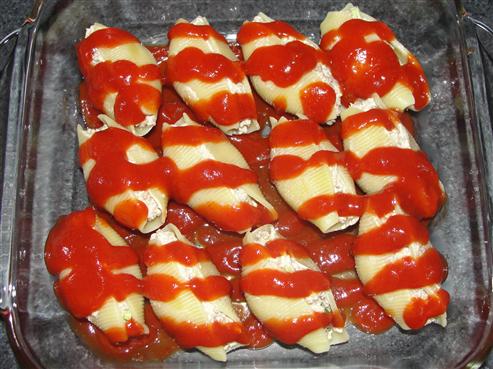
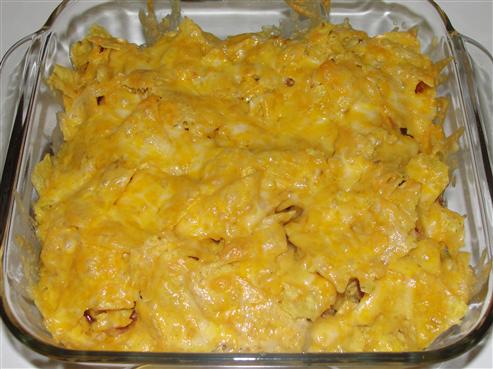
    Cover with foil and bake for 15 minutes.  Now for the fun part.  Break up your corn chips and sprinkle them over the top.  Looking better by the minute, isn't it? 


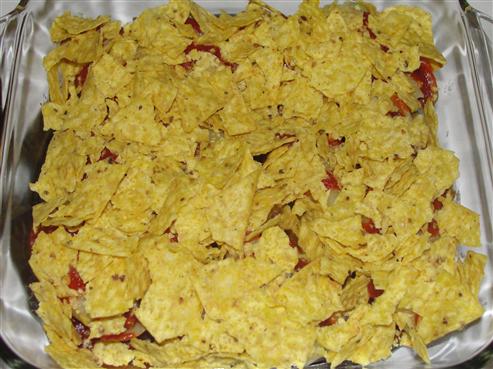
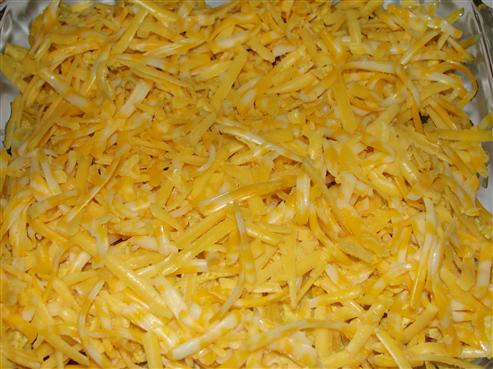
    Next comes the cheese.  When it comes to cheese, I rarely think a little is sufficient. 


    Now pop it back in the oven for another 15 minutes.  It’s amazing what a little heat does to a pile of shredded cheese.  It has now transformed into bubbly, golden, deliciousness. 


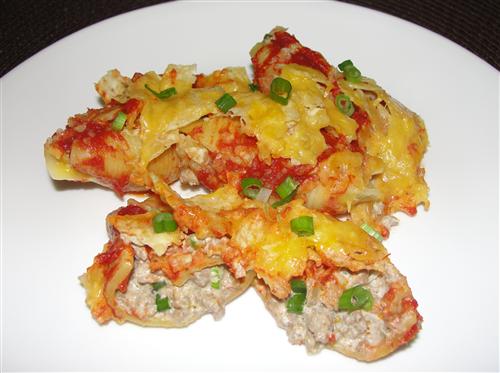
    Ok, so it kind of looks like nachos in that shot, but it is so much more.  Scoop out the desired number of shells and sprinkle with a few more green onions. 


    **Disclaimer**  

    Authors Kitchen is not responsible for discomfort or missing buttons caused from eating “just one more shell”.       

    Tuesday
    Sep022014

    The Best Raspberry Cheesecake Ever!

    So, this probably isn’t exactly the picture that comes to mind when someone says the word cheesecake, but this is the cheesecake from my childhood.  It was a rare treat we’d usually only get during raspberry season, but it's always been one of my favorite things.  I’ve tasted different varieties of cheesecake from all kinds of restaurants, even including the Cheesecake Factory, but none of them was ever as good as Mom’s.  Now I’m going to show you how to make it. 

    Here’s what you’ll need:

    Crust:
    13 graham crackers
    1 Tablespoon sugar
    ½ teaspoon cinnamon
    ½ cup butter

    Cheesecake:
    12 oz. cream cheese
    ¾ cup sugar
    1 ½ Tablespoons lemon juice
    2 teaspoons vanilla
    3 eggs

    Fruit topping:
    1 ½ cups juice
    2 Tablespoons corn starch
    ½ cup sugar

    First up, the crust.  Melt one stick of butter and set it aside.  Then, in a food processor or blender, grind the graham crackers into very fine crumbs.  Pour them into a 9 inch pie pan and sprinkle on the cinnamon and sugar.

    Mix those ingredients together and pour on your butter.

    With a fork, stir the crumbs and butter together until you get something that resembles wet sand.

    Now, spread the crumbs evenly in the pan, and press them into shape.  I used a small measuring cup, which has a flat bottom and is the basic shape I want for the edges as well.  If you don’t have measuring cups like these, be creative.  I’m sure you can find the perfect tool somewhere in your kitchen. 

    Now, place the crust in the fridge and preheat your oven to 325°.  It’s best if all the ingredients for the filling are at room temperature, so pull them out several hours ahead, or even the night before will be fine.  Put the cream cheese in a bowl and mix until it’s nice and smooth.  Then, add the lemon juice, vanilla, and sugar.

    Mix those together, and you’ll end up with something like this. 

    As evidenced by the glops of unincorporated cream cheese, this bowl and beater need to be scraped down. 

    Ah, that’s much better.  You’ll want to scrape down the sides and bottom of the bowl, along with the beater, several times throughout this process.  So, where were we?  Oh yes, time for the eggs.  I like to crack mine into a separate little dish and add them from there.  Not only does it give you a chance to pick out shells if you get them, but it’s also the perfect place to pick the white goobers off of the yolk.  Yes, my mom assures me that goobers is in fact, the scientific term for those things.  And yes, I do remove them from every egg I use.  You all were starting to wonder where I get these magical eggs that don’t have goobers, but really, it’s just a bit of my OCD showing.  Now that we’ve covered that, add your eggs, one at a time, to the mixture.  Make sure each one is fully incorporated before adding the next. 

    Scrape and mix a few times until everything is nice a smooth, then pull out your pie crust and pour in the cheesecake mixture. 

    Pop it into the oven and bake for 40 minutes.  There will still be a bit of jiggle factor when you remove it from the oven, but it should all move the same.  If the center is softer, give it a few more minutes of cooking time. 

    As you can see, mine had a couple big air bubbles, but not to worry.  Those will be completely covered soon enough.  For now, leave it to cool for an hour or so before starting on the fruit topping.  If it doesn’t have time to cool down, the steam it gives off during that process will cause the cheesecake and fruit topping to separate.  For the filling, the first thing you need to do is wash your berries.  I don’t know how many times I’ve seen tv chefs just open the container and dump them in.  Personally, I’d like to get rid of as many bugs as possible.  Be gentle, though.  Raspberries are fragile. 

    Now for the sauce.  Put your sugar and cornstarch in a pan and whisk them together.  This ensures you won’t have any lumps of cornstarch. 

    Pour in your juice and turn the heat to medium.  I used a mixed berry juice.  You can use whatever flavor you like, but the closer you can get to raspberry, the better. 

    Stir, making sure you get all the way into the corners of your pan, so you don’t miss any of the cornstarch.  Keep stirring until the mixture just comes to a boil, then turn off the heat.  Add the raspberries and stir gently. 

    Let the mixture sit for a few minutes to give the raspberries a chance to give off whatever liquid they’re going to, then stir it once more, and pour it over the top of your cheesecake. 

    Place the whole thing in the fridge and allow it to chill for several hours.  Don’t rush it.  For me, it’s best to do this right before bed. 

    Mmmmmm.  Cheesecake for breakfast.  What?  It’s fruit and cheese and… ok, it’s cheesecake, but it’s fabulous, whenever you eat it.